在上一篇文章noVNC的使用之一中,介绍了noVNC的安装配置和使用方法,在本文中继续介绍一下如何将noVNC集成到django工程中。下面假设你已经有一个简单的django工程了。
配置说明:
- django 1.8.0
- 安装了vncserver和novnc
设置静态文件
假设你的django静态文件目录为static,并且你已经在settings.py文件中设置好了STATIC_URL和STATICFILES_DIRS:
STATIC_URL = '/static/'
STATICFILES_DIRS = (
    os.path.join(BASE_DIR, 'static/'),
)
把noVNC目录下的images和include文件夹拷贝到django工程的static目录下;把vnc.html和vnc_auto.html拷贝到django工程的模板目录templates下。
将noVNC代理程序移植到django工程中
在django工程目录下新建目录:mkdir -p utils/vnc;
将noVNC的关键代码utils文件夹拷贝到上面新建的vnc目录中;
添加配置文件
在utils/vnc下面新建vnc_tokens目录,cd进去,新建token文件vnc-1.ini,内容如下:
abc123: 192.168.1.101:5900
123abc: 192.168.1.102:5901
token配置文件比较灵活,如果有多个被控终端(or虚拟机),可以把所有终端的token写在同一配置文件中,也可以每个终端写一个配置文件。
在项目中启动novnc代理
有以下几种方法:
-
线程 (threading) , 不行, 这个服务只能在主线程中跑
-
子进程 (subprocess), 不行, 主进程会被阻塞
-
多进程 (multiprocessing) , OK
在工程wsgi文件中添加以下代码:
def worker():
    '''
        Multi process service VNC start
    '''

    dir_path = os.path.join(os.path.dirname(os.path.dirname(__file__)), 'utils')

    websockify_path = os.path.join(dir_path, 'vnc', 'utils', 'websockify', 'websockify.py')
    web_path = os.path.join(dir_path, 'vnc')
    target_path = os.path.join(dir_path, 'vnc', 'vnc_tokens')

    cmd = u'python %s --web=%s --target-config=%s %s' %(websockify_path, web_path, target_path, settings.VNC_PROXY_PORT)

    os.system(cmd)

def start_websockify():
    '''
        Start the VNC agent service
        ./utils/websockify/websockify --web=. --target-config=vnc_tokens 6080
        {'target_cfg': '/home/xiaofei/work/noVNC/vnc_tokens', 'listen_port': 6080}
    '''

    print u'start vnc proxy..'

    t = Process(target=worker, args=())
    t.start()

    print u'vnc proxy started..'

start_websockify()
记得import相关的包。这样在启动django时就会启动noVNC代理进程。
views和urls
创建app:python manage.py startapp novnc,在其views.py中添加代码:
from django.shortcuts import render
from django.conf import settings
def run_vnc(request):
    '''
        Call the VNC proxy for remote control
    '''
    view_only = request.GET.get('view_only', 'false') # False can control the or true can only view

    # The proxy server IP and port, this usually use school server LAN IP (127.0.0.1, 6080 is the default port)
    host = '127.0.0.1'
    port = settings.VNC_PROXY_PORT

    # return render(request, 'vnc_auto.html', context_dict)
    return render(request, 'vnc.html')
在工程urls.py中添加url映射:
from novnc import views
url(r'^vnc/$', views.run_vnc)
运行
启动服务器:python manage.py runserver 8008,在浏览器中输入http://localhost:8008/vnc/出现novnc页面:
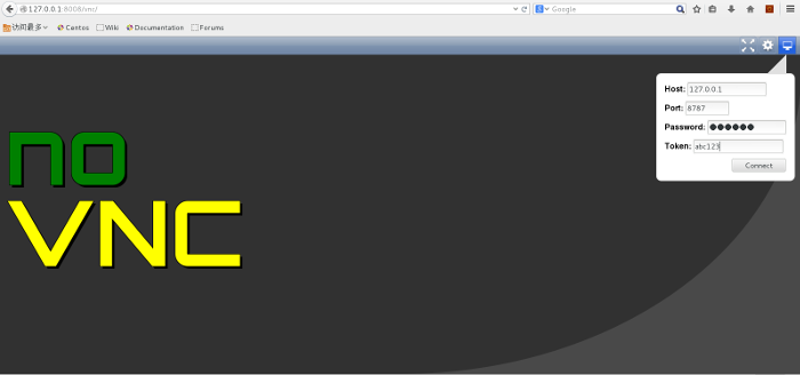
一开始可能不会出现上面的页面,是因为一些静态文件,比如图片,CSS,js文件找不到造成的。需要修改vnc.html文件中的静态文件路径,将所有href="include/black.css"中的include替换为/static/include,所有的src="images/mouse_right.png"中的images也替换为/static/images,再次访问,就可以看到正常的页面了。还需要另外修改一下js文件的目录。
在vnc.html末尾处
<script src="include/util.js"></script>
<script src="include/ui.js"></script>
修改为:
<script src="/static/include/util.js"></script>
<script src="/static/include/ui.js"></script>重新访问,填写Host,Port,Password,Token等,连接,打开F12调试,发现若干js文件请求不到,包括webutil.js, base64.js, websock.js等,排查发现,这些文件是在ui.js中加载的:
Util.load_scripts(["webutil.js", "base64.js", "websock.js", "des.js",
                       "keysymdef.js", "keyboard.js", "input.js", "display.js",
"rfb.js", "keysym.js", "inflator.js"]);load_scripts()函数位于util.js文件中,其中的一段代码用来创建标签:
script = document.createElement('script');
        script.type = 'text/javascript';
        script.src = Util.get_include_uri() + files[f];
console.log("loading script: " + script.src);其中的get_include_uri()函数用来获得js文件的路径:
Util.get_include_uri = function () {
    return (typeof INCLUDE_URI !== "undefined") ? INCLUDE_URI : "include/";
};
我们修改为:
Util.get_include_uri = function () {
    return (typeof INCLUDE_URI !== "undefined") ? INCLUDE_URI : "/static/include/";
};
这样django就能根据settings.py文件中设置的STATIC_URL找到所需的js文件了。
重新访问,成功连接。
提示:事实上,作为转发代理的websockify(位于utils文件夹下)和显示被控终端的静态文件(vnc.html,vnc_auto.html以及所引用的css,js文件)不一定非要在同一台机器上。我们只需要在作为代理的机器上启动websockify代理进程,然后在能够访问该代理机器的任意一台机器上在浏览器中打开vnc.html或vnc_auto.html,输入代理机器地址、端口、密码和token,即可访问对应的终端或虚拟机。当然也可以在打开html文件的同时将host、port、token作为查询字符串参数传入,即可自动连接。即:vnc_auto.html?host=127.0.0.1&port=8787&token=abc123。
具体可参考我的示例项目:django_noVNC